Easy Crochet Granny Square: Free Beginner Pattern Guide
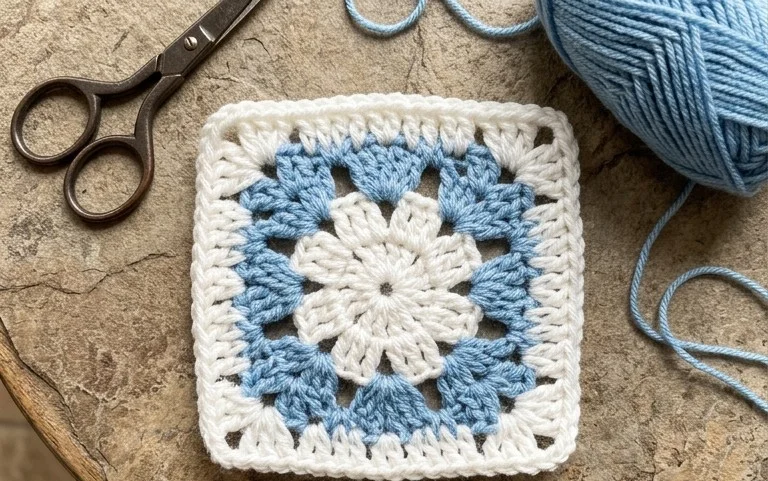
These squares carry the weight of a warm wool blanket, feeling substantial and soft against your skin as the autumn chill settles in. They suit beginners who want to master double crochet clusters, as well as gift makers looking for a quick, rhythmic project that builds into a larger heirloom piece. You will notice how the texture creates a balanced, geometric aesthetic that looks beautiful in both solid colors and mismatched yarn scraps. By working in simple rounds from the center, you learn to maintain tension and square corners, which gives your final fabric a professional, clean finish for any home decor project.
Why You’ll Love This Pattern
The Classic Crochet Granny Square is the quintessential building block of crochet, relying on simple clusters of double crochet stitches that create a geometric, airy texture. This pattern works up quickly, making it ideal for utilizing leftover yarn ends from larger projects. Because it grows in rounds, you can easily control the final size by simply adding or subtracting rounds, making it highly versatile for blankets, tote bags, or cardigans. The repetitive nature of the stitches provides a rhythmic experience that is both meditative and relaxing for makers of all skill levels.
I found the instructions for the corner clusters very clear, which helped me keep my square perfectly flat and symmetrical without any curling corners.
— Sarah, beginner crocheter
Pattern Overview & Skill Level
- Skill Level: Beginner
- Approximate Time: 30 to 45 minutes per 6-inch square
- Construction: Worked in rounds, starting from the center and moving outward
- Finished Dimensions: Customizable; standard size provided is 6 inches by 6 inches
Materials & Supplies Needed
- Yarn: Worsted weight (#4), 100% acrylic or wool blend, approximately 25-30 yards per square.
- Hook Size: 5.0 mm (US H-8) crochet hook.
- Notions: Tapestry needle for weaving in ends, sharp scissors.
- Yarn Substitutions: You can use DK weight yarn with a 4.0 mm hook for a smaller, tighter square, or bulky weight yarn with a 6.0 mm hook for a larger, quicker square. Note that changing weight will significantly impact the finished size and drape.
Stitch Guide & Abbreviations (US Terms)
- ch = chain
- sl st = slip stitch
- dc = double crochet
- cluster = a group of 3 dc stitches worked into the same space
- sp = space
- rnd = round
Step-by-Step Pattern Instructions
Center and Foundation
- Rnd 1: Ch 4, join with sl st to first ch to form a ring. Ch 3 (counts as dc), work 2 dc into the ring, ch 2, *3 dc into ring, ch 2; repeat from * two more times. Join with sl st to top of beg ch-3. (4 clusters, 4 ch-2 spaces)
Working the Rounds
- Rnd 2: Sl st into the next ch-2 sp. Ch 3, 2 dc, ch 2, 3 dc in same sp (corner made), *ch 1, skip 3 dc, (3 dc, ch 2, 3 dc) in next ch-2 sp (corner made); repeat from * around. Join with sl st to top of beg ch-3. (8 clusters, 4 corner spaces, 4 side spaces)
- Rnd 3: Sl st into the next ch-2 sp. Ch 3, 2 dc, ch 2, 3 dc in same sp, *ch 1, 3 dc in next ch-1 sp, ch 1, (3 dc, ch 2, 3 dc) in corner sp; repeat from * around. Join with sl st to top of beg ch-3. (12 clusters)
- Rnd 4: Continue in the same manner, working (3 dc, ch 2, 3 dc) in each corner space and 3 dc in each side ch-1 space. Ch 1 between all clusters. Continue until you reach the desired size. (16 clusters)
Finishing
After completing your final round, cut the yarn leaving a 6-inch tail. Pull the tail through the loop on your hook to secure. Use your tapestry needle to weave the yarn tail securely through the back of the stitches, ensuring the square remains flat.
Care & Washing Instructions
- Machine wash in a mesh laundry bag on a gentle cycle with cool water.
- Lay flat on a clean towel to air dry, reshaping the square while damp to ensure it remains a true geometric shape.
- If the square appears slightly distorted, steam block it lightly by holding a steam iron a few inches above the surface without touching the yarn.
Pro Tips & Common Mistakes to Avoid
- Maintain consistent tension, especially on the chains between clusters; if your chains are too tight, the square will begin to cup or bowl inward.
- Always place a stitch marker in the first stitch of each round to easily identify where to join, as the starting chain can sometimes hide in the cluster.
- Weave in your ends as you go, particularly if you are changing colors every round, to save time during the final assembly.
- To adjust size, simply work additional rounds following the rule of adding one extra cluster along each side for every round added.
Frequently Asked Questions
Can I use different colors for each round?
Yes, this pattern is perfect for using scrap yarn. Simply fasten off at the end of each round and join your new color in any corner space to start the next round.
Why is my square not laying flat?
If your square is ruffling, you likely have too many stitches; if it is cupping or pulling tight, you likely have too few chains between the clusters. Check your stitch counts against the instructions.
Are these squares suitable for beginners?
Absolutely. Because the pattern relies on double crochet and simple chain spaces, it is the standard project for learning how to work in rounds and identify stitch placement.
Can I sell items made from this pattern?
This pattern is intended for personal use. If you wish to sell finished items, please ensure you are following the specific copyright terms of the designer or creating your own unique variation of the classic granny square.
Finishing these warm, woolly squares provides a deep sense of accomplishment as you watch your pile of yarn ends turn into a cohesive, functional textile. Try using a variegated yarn for the final border to give your project a modern, high-contrast look that pops. Once you have a stack ready, take a quick photo to share with our community so others can see your color choices. Browse our main archives for more free patterns to continue building your skills throughout the colder months of the year.